Since we have a few openings for jr. roles in our team, we’re putting together a recruitment day towards the end of this month, as announced on our LinkedIn post:
Come and join our tech graduate recruitment day on Thursday 31st January 2019. We will be recruiting for Junior Backend Engineers and Junior Mobile Engineers.
To be considered please send your CV to
mifra.khan@namshi.com
Ready to meet some members of our tech team? š¤š»āļøš
Yalla, submit!
]]>On January 1st, Namshi moved the majority of its infrastructure to Google Cloud Platform in order to take advantage of GKE, the incredible managed-Kubernetes service GCP offers. When you visit namshi.com, you will be served from the new infrastructure we migrated to, which includes our web applications as well as database servers.
This concludes an activity we initially thought of a year and a half ago and started working towards in Q2 2018.
In this post, weād like to describe both how we migrated 6 years of infrastructure from AWS to GCP as well as the toughest challenges we faced along the way.
At Namshi, we heavily rely on Kubernetes to run our web services workloads as we aim for a microservices architecture. At first, we used SaltStack to provision our Kubernetes clusters on EC2 instances but later moved to Kops as it was easier to manage and create clusters, however it still felt a bit tacky.
We were looking for a cloud provider that integrated seamlessly with Kubernetes and looking at GKE, it was Kubernetes native which gave it a lot of advantages compared to others such as:
We kicked off our journey by first meeting with the Google engineers, led by Ziad, to understand what GKE had to offer and how to fully take advantage of it. Other than our Kubernetes workload, we have databases running in RDS and Elasticache, so it was vital to know whether or not we ād be migrating our databases. We also ran a good chunk of our workloads on spot instances, so thatās something we would have like to keep on GCP.
Following the meeting, we concluded that using spot instances (aka preemptible nodes in GCP) to run a majority of our workload wouldn’t be as straightforward due to the termination of instances after 24 hours and no guarantees in terms of termination notifications. Weād also have to find a way to replicate from RDS to CloudSQL and later promote it to master, as going the good old fashioned way of mysqldump
would have been pretty risky. We compared MemoryStore to Elasticache and found that MemoryStore wasn’t mature enough so we decided to stick to Elasticache in AWS.
Putting our staging environment on GCP was the first stepping stone to the big move. It was essential to get familiar with Stackdriver, managing the cluster from a simple UI, performance testing our applications with CloudSQL, however Elasticache and SQS were still running on AWS which may cause latency issues. It also gave our devs a chance to play around with the powerful logging and monitoring tool Stackdriver has to offer, which they choose over Prometheus for application metrics.
The most vital part of the whole migration was achieving a reliable/consistent replication process from RDS to CloudSQL.
Our first gut instinct was to use CloudSQLās migrate data feature that lets you replicate from an external source such as AWS or on-premise, but it required the source to have GTID enabled which AWS didn’t have at the time. All our time went into finding a seamless method to replicate the data using tools like Attunity Replicate and Percona XtraBackup that weren’t very reliable because of how long it took (we also observed inconsistent data from import to import).
Luckily, on the 12th of October AWS announced the support of GTID on MySQL 5.7.23. This required downtime of around 10 minutes to upgrade our master instances and then replication would be as simple and reliable as ever from one MySQL instance to another across clouds using CloudSQL migrate data.
Other than the RDS issues, we had a few issues here and there such as kube2iam, S3 and Elasticache latencies.
Kube2iam is an awesome tool that allows pods to authenticate using the EC2 nodes metadata instead of credentials. It made our lives a lot easier on AWS, but it wasnāt cloud agnostic at all. It required provisioning of new credentials and, in some cases, code changes to authenticate using credentials instead of metadata.
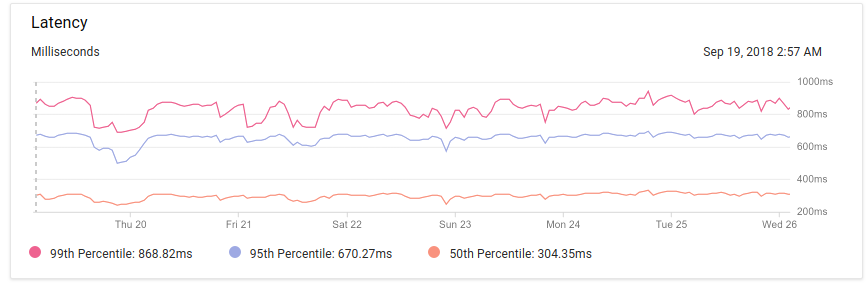
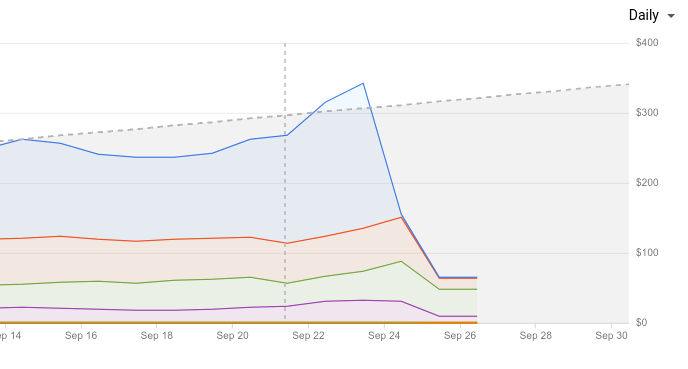
While running tests on a replica of our production environment on GCP, the latency to SQS, Elasticache and S3 in different regions was a few seconds – we expected some latency but nothing this crazy! We decided to migrate a few important S3 buckets using the cross-replication policy, provision new SQS queues and an Elasticache cluster in regions closer to GCP that saw the latency drop back down to a few hundred milliseconds and we can live with that.
As the end of the year was approaching, we had to find the best time to perform the actual migration as it required 3 hours of downtime. We consulted our PM team about the scheduled downtime, turns out New Years 4 am was the best time to carry out such a risky and long migration.
Hereās a list of the actual migration steps we followed:
Everything was followed as planned and the predicted timings we had for each task was spot on. However, nothing goes ever as planned as we had one problem due to insufficient memory on the new ElastiCahce instance which was fixed by upsizing the instance. Other than that, the whole migration seemed seamless and, for a second, we forgot how big of a task this was.
At 7 am on January 1st, we brought all of our services all backup and watched our monitoring systems for any issues or anything unexpected. It’s a big relief to say that we didnāt get any complaints from customers and other than the downtime, it seemed like nothing had changed.
The same canāt be said for a few of our internal tools, where we noticed a few problems, but were mostly due to them still pointing to the wrong MySQL endpoint or S3 bucket. The fixes were pretty straightforward and everything in our internal tools were back to normal.
After ensuring everything was running fine on GCP, it was time to scale down our old Kubernetes cluster running on AWS, as well as remove any RDS and Elasticache replicas.
Something weād like to clarify is that we still rely on AWS for a bunch of services, as we believe a world of multiple clouds allows us to pick the right tool for the job. There are some services we think are more suitable to be kept in AWS, and decided against migrating them ā we might revisit these decisions later on but, for now, weāre happy with where we are.
AWS has served as a strategic partner for Namshi for over a lustrum, so weād like to mention that weāre not running away from a bad provider, but rather that we found GCP more suitable for the kind of workloads and stack Namshi runs on.
We are very happy with this activity as it allows our infrastructure to run in an environment (GKE) that is more suitable for our stack. Additional benefits, like cost reductions and better integration with other parts of our stack (like data warehousing, which has been running on GCP since its inception), are secondary to the fact that we have eliminated in-house management of our Kubernetes clusters, a tedious activity weād like GCP to take care of, in order to let us focus on our domain-specific challenges.
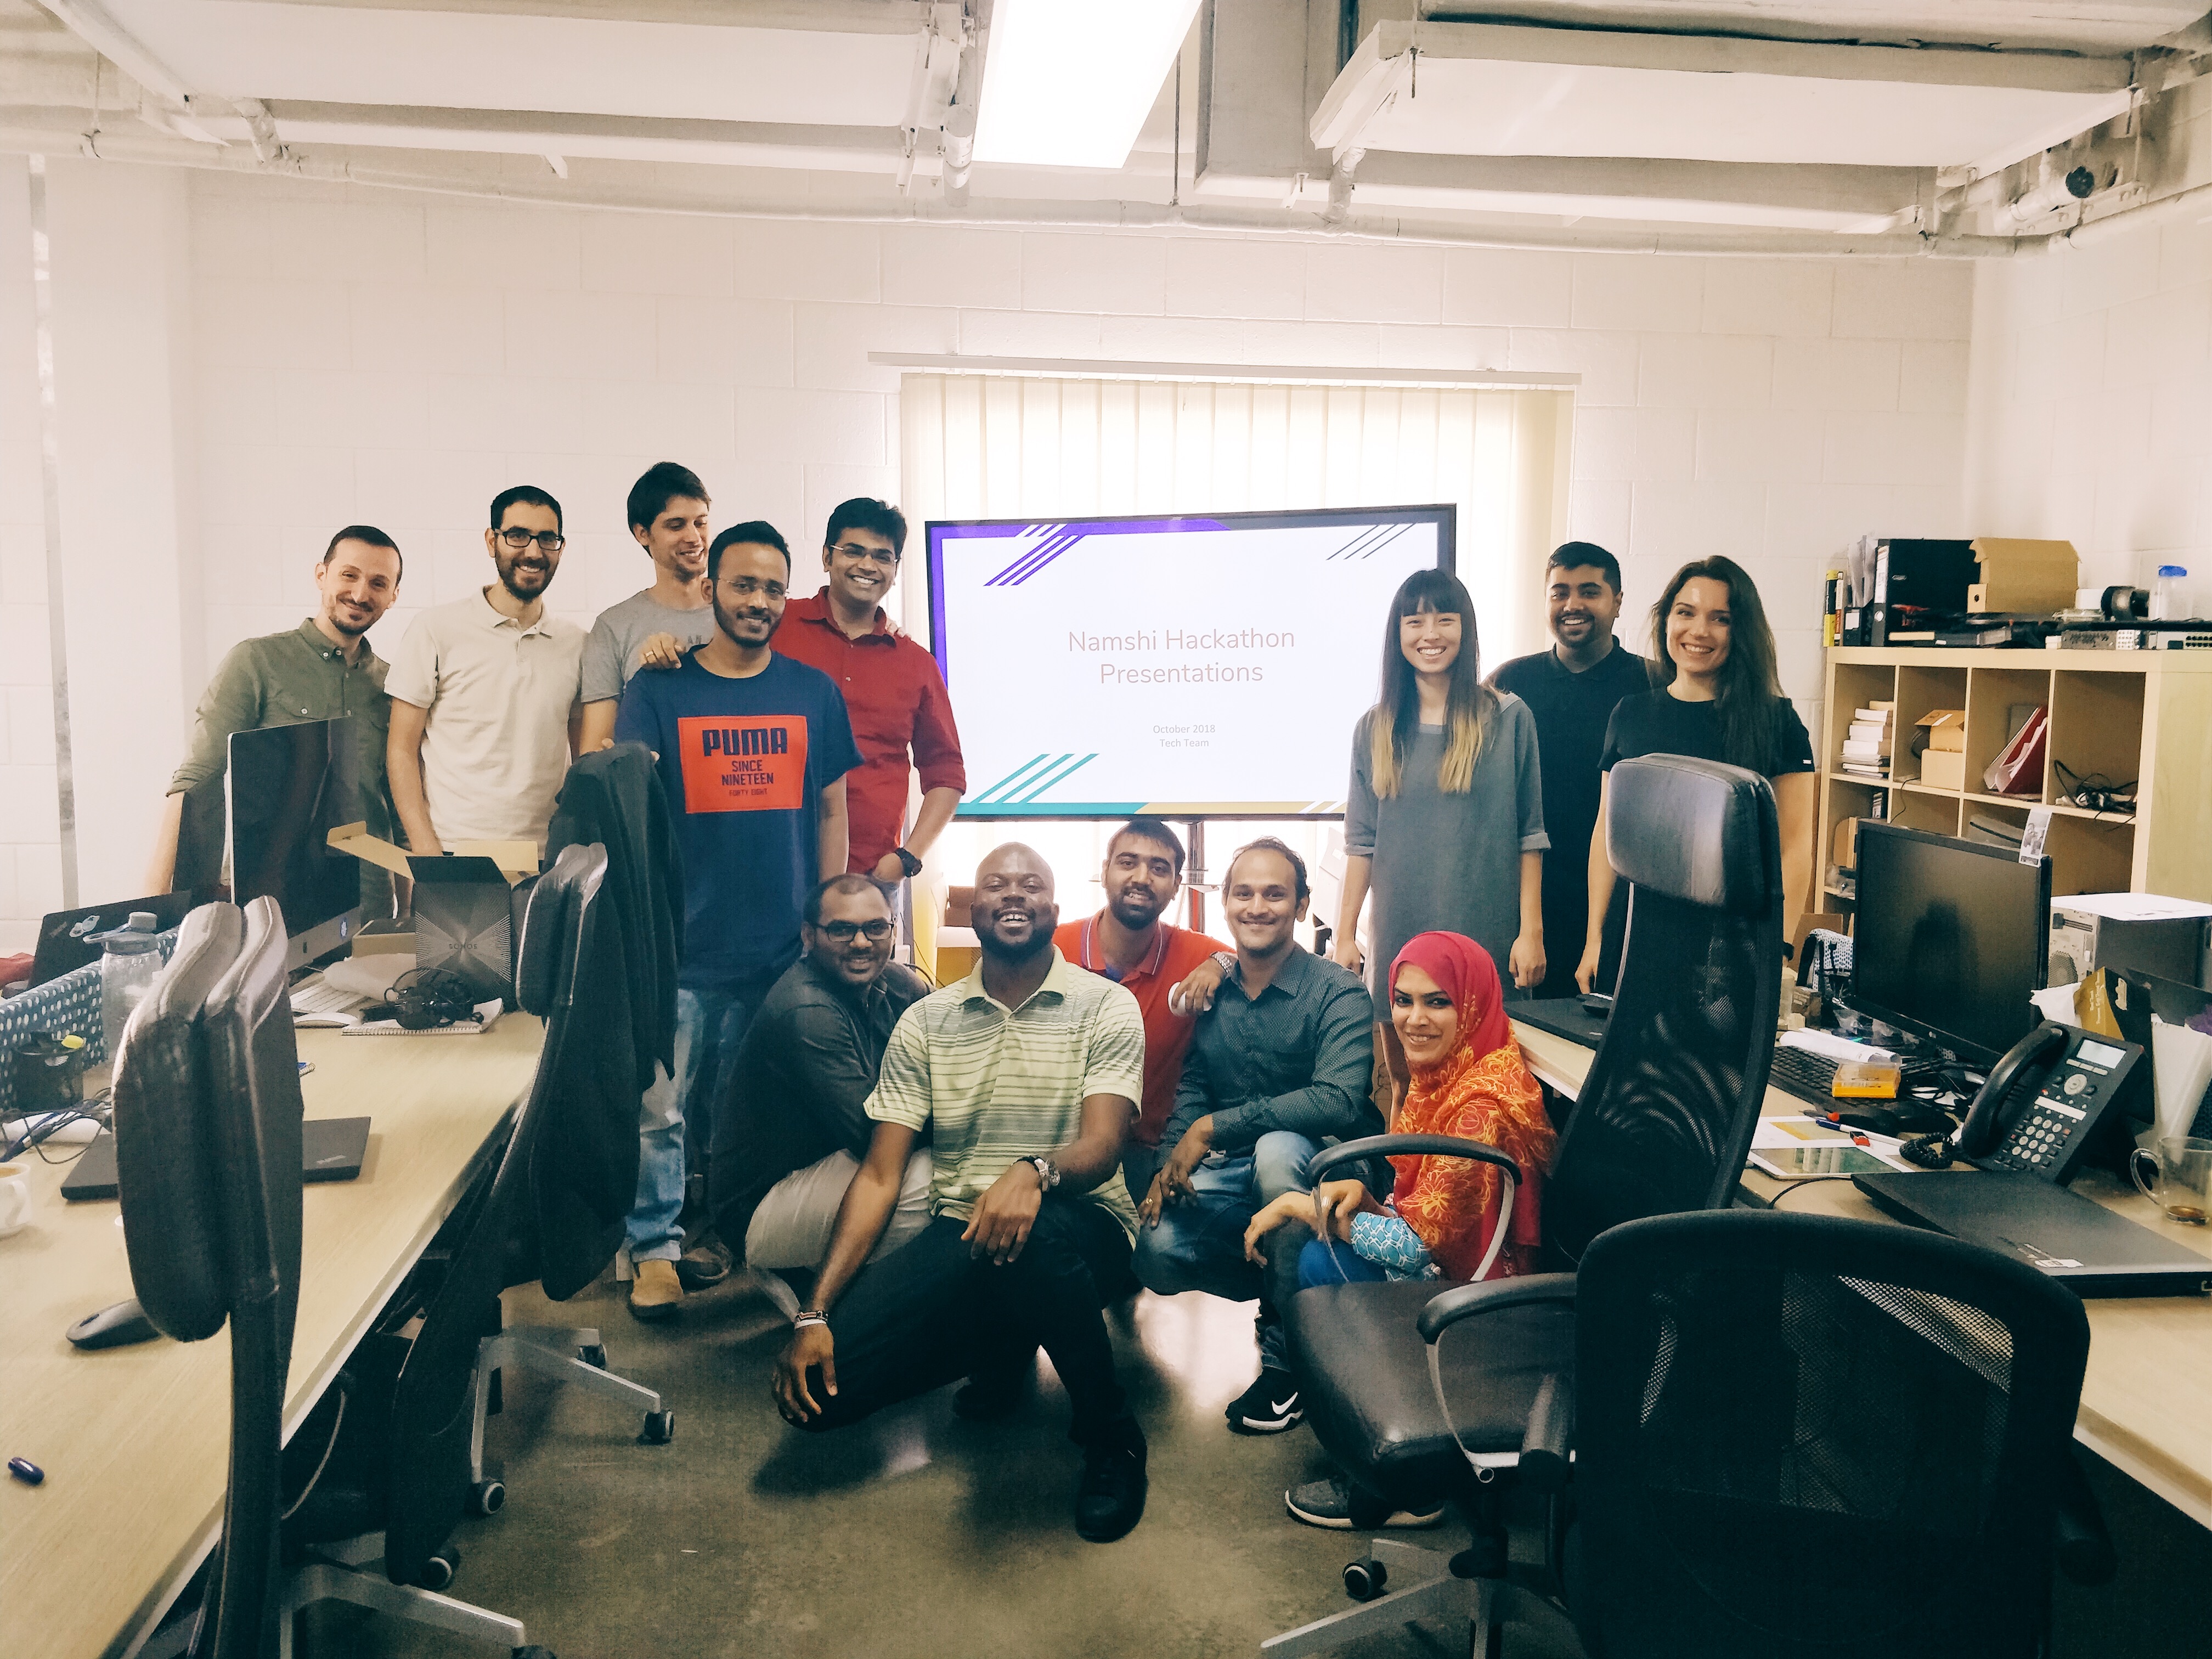
A special thank goes to Andrey, Carles and Ayham, as they shared the burden of this legendary task along the way, and sacrificed their NYE to let Namshi take a step forward!
]]>A couple weeks ago, I tried to login into one of our legacy internal services here at Namshi: to my surprise, I was redirected to a brand new, flashy app that seemed to have replaced that good old monolith.
What does that mean?
It means multiple things: first and foremost, our team rocks! They completely replaced one of our oldest services without people (granted, people like me) noticing.
But the most important thing I realized was that was the last (and oldest) service which was in use at the time I joined Namshi, around 7 years ago.
That’s it: our team managed to rewrite the whole of Namshi over the past 7 years, a feat that reminds me of the words of Dave Hagler, systems engineer at AOL:
The architecture for AOL.com is in itās 5th generation. It has essentially been rebuilt from scratch 5 times over two decades. The current architecture was designed 6 years ago. Pieces have been upgraded and new components have been added along the way, but the overall design remains largely intact. The code, tools, development and deployment processes are highly tuned over 6 years of continual improvement, making the AOL.com architecture battle tested and very stable.
We didn’t really start our “SOA” mission until 2013, when
it became clear that our 2 monoliths (frontend & backend)
wouldn’t be able to help as much while we were trying to
scale in a lean way: we first started building APIs for our
catalog, checkout, order processing… …until late
December 2018, when the last service (codename bob
)
was decommissioned.
We’ve come a long way, I must admit it. What we achieved over almost a decade here makes me proud of being one of the earliest Namshees.
I want to thank Ala and Sakina for rewriting bob
, now
only a memory, as well as Razan and Ayham who are the
only other members of our tech team I had the pleasure
to work together with since the start of my adventure here.
What a ride, folks!
]]>We’ve pionereed the Open Source culture in the region, at a time when companies did not fully understand the potential of sharing their work with a broader community. Years ago, it wasn’t easy to find a Dubai-based company sharing their tech out there, and we’re proud to see how that has changed.
It’s not just Namshi, as nowadays you will find companies like Tajawal talking about their stack on Medium, or Al Tayer Digital releasing software on GitHub. We feel partly responsible for that and are happy to see the community growing!
Back to us for a second: since 2012, Namshi has released 80 OS libraries, ranging from debugging utilities to iOS views and Docker images. We did not invent the “library of the century” but we’re happy that others have found our work useful: mockserver and winston-graylog2, for example, get downloaded thousands of times a week — and we definitely feel good about lending a hand to the community.
The truth is that Namshi could not have ever been if it wasn’t for OS technologies: we understand that, and want to be able to give back to the community as much as possible.
With that in mind, we decided to introduce an initiative called “OSS day” to promote the OSS culture within our team.
Starting from the 1st of January 2019, engineers within our Tech team will be free to dedicate one day a month on Open Source: no matter whether that’s by working on their own project, collaborate with others in the team, sending a PR to an existing OS project or writing documentation for a random GitHub repo, they will be able to spend some of their “Namshi-time” to help and improve the OS world.
We hope great things will come out of this and, if not, we think this initiative will at least help our team members get acquainted with the Open Source world, so that they can better understand this mysterious pillar of our industry — because, trust me, without OSS we’d be at least 10 years behind.
We do not have a specific “OS budget” (a budget we can spend to support someone else’s OS project), but that is something we’ll be discussing down the line, as it feels the natural next step for a company that cares about the OS world.
Well, that’s about it for today! Happy new year in advance, folks!
]]>We, though, would like to share the story and advices from the women who are part of our team, with the hope that they’ll inspire others to join us, or to simply give computer science, or programming in general, a go.
Without further ado, let me introduce Ming, who:
…holds a B.S. in Computer Science from NYU Abu Dhabi. She has been passionate about building robust web and mobile applications since college. She loves writing clean and effective code and building reliable and robust system. She joined Namshi’s back-end team in early 2018 and is excited to learn new skills and solve new challenges. Her technical skills include Python, Java, Javascript, HTML, CSS, Heroku, Node and more. In her free time, Ming can be found checking out technical blogs, reading about blockchain or baking apple pies.
Can you briefly tell us a bit about yourself?
After realizing that I will not make it to the Victoria Secretās Fashion Show (I wasnāt close), I spent years studying at a college in Abu Dhabi until I discovered my interest: working on tech solutions. So it is no surprise that I joined Namshi recently as a junior software engineer, building infrastructure tools as well as customer-facing apps. I have been a perfectionist coder and I always want my work to be impeccable. Outside work, I enjoy traveling the world, playing Nintendo Switch and eating my way through the places I visit.
How did you get into programming & computer science?
I went to a few programming workshops out of curiosity when I was in high school in China. Back then not many people were into programming, so there were usually just three or four of us sitting in the workshops. It was probably around 2012, and I remembered learning about queues, stacks, Pascalās triangles and some idiosyncratic algorithms. Everything was just really fascinating to me. So I started writing tiny pieces of code in Pascal (yep Pascal), but the coding activity didnāt really continue.
Later I entered college and I wanted to be a civil engineer and build bridges for the people. Yet it turned out I absolutely hated the mundane and complicated courses. So after a week in college, I dropped all my engineering courses and went for computer science instead. I loved it so much more, and thatās how it all started.
What does your typical day at work look like?
My work at Namshi is very exciting every day! I go to office around 10 AM and start by prioritizing my tasks of the day on Jira or Trello board. I always talk to my teammates at the start of the day to ask for their feedback or opinions on my tasks and solutions. I like working closely with the senior members (usually with Joe or Ala), and learning new knowledge and skills from them every day. I also like singling out some big chunks of time to write code without distraction by myself. When Iām not coding, I can be find reading HackerNoon, waiting for a latte in the pantry, or just checking out what the other teams are working on.
What is the most challenging project you worked on? The one that made you the proudest?
The most challenging project at Namshi so far is the Apple Pay Integration on web. To be honest, I didnāt expect it to take so much time and effort for this payment integration. When I started working on it, I realized that Apple has really horrible documentation and every piece of information needs some effort to gather. Iām really proud we made it to work in the end.
Outside Namshi, I also worked on a human digital chatbot in college. You can check out my project video here. It was published in ACL, presented in Abu Dhabi National Exhibition Center and selected for SIGDIAL conference in Australia. I was really proud of it.
What advice would you give to a woman considering a career in the tech industry? What do you wish you had known?
I love a quote by Nelson Mandela: It always seems impossible until itās done. I think the advice from me would be to be brave, try new things and believe in the impossibilities. Coding is a very intellectual activity and I believe everyone can learn to do it, no matter male or female, old or young.
If I could start over, I wish I was more engaged with finding or building a developer community in the UAE. It is always fun to work with people on projects that have real-life impacts.
Thanks Ming — both for sharing your experience and keeping the Namshi backends under control! :)
]]>During the first weekend of October, Namshi hosted the second internal Hackathon at our lovely TECH team office. It was time for our software engineers to celebrate the spirit of innovation and entrepreneurship through cross-team collaboration and rapid prototyping – We had a lot of fun!
Back in January 2018, Namshi’s senior backend engineer Joe Jean founded and organized Namshiās first hackathon. Although our team was smaller, the first hackathon concluded with success and saw the potential of thinking outside the box and sparks for business innovation. We felt strongly that the hackathon needed a sequel and so came back with bigger teams, crazier ideas and more excitement. We looked to invite product managers and data scientists to join for an interdisciplinary experience.
Our theme this year is Dream it, Build it, Ship it. It sees hackers come up with new solutions or features that are implemented within two days. At the end of the two days, each team presents their progress with slides and a demo to a team of four judges who evaluate based on three criteria:
1) How crazy is the idea?
2) How much value does it provide?
3) How well executed is the idea?
Based on assessment against these metrics judges decide on the winning teams. Not only do the winning teams get rewarded with some amazing prizes, but the selected few ideas also go live in our app.
This year Namshi encouraged ideas not only limited to e-commerce. With the freedom to brainstorm and work on whatever they want, hackers have proposed some unique ideas.
Brainstorm! The outburst of ideas before hacking begins. This year, one of the most sought after ideas was to use the power of social.
One team makes use of social networks to drive sales. The idea is that customers will share products they buy on Namshi and get rewarded with Namshi credits if their friends buy the same products using their link.
Another team increases conversions with the psychological phenomenon of social proof to ease the minds of worried customers. Similar to Bookings.com and Airbnb, the idea was to display a badge such as “5 other people are currently viewing” or “Only 3 items left” to give users social insights as well as a sense of urgency of the popularity of the products they are viewing.
Besides updates on social, hackers also came up with ideas such as integrating Augmented Reality to display products; or recommending personalized products based on customers’ viewing history; or introducing a monthly subscription mystery box with a customerās preferences, etc.
With the hack underway, free food and drinks were provided ;)
Shop Connect – helps you connect with your social media circle so that you can take informed buying decisions when shopping online
Personalized Shopping – provides you a personalized shopping experience by recommending products based on your viewing history and activities
Make Your Style – involves you in creating new styles and designs as well as reward you for your creations
Share and Earn – allows you to share products you order from Namshi on your Facebook, Twitter and other social media timeline, and reward you Namshi credits for successful referrals
Surprise Box – introduces you a subscription based product that allows you to receive curated fashion accessories that follow certain themes or trends
Express Checkout & Direct Payment Links – simplifies checkout process to one screen, with possibility of delayed payment so you can pay for your friends or pay for your orders later
Social Proof – provides you more information on the social interest scarcity and satisfaction on Namshi products to help you make buying decisions
Four judges made up of the management team selected two winning teams. Whilst all ideas were met with enthusiasm, it came down to the value add and how well executed it was in the end.
š„ Social Proof š„
This team builds on the idea of social proof to increase conversions and revenue. It’s a simple idea with a huge impact. We saw their great work as a product of teamwork: Carles and Ala from the backend team, Noor from the mobile team and Anastasia from data science. With the combined skills and enthusiasm of each member, they were able to implement the social proof feature to its full extent and presented its unlimited potential to us.
This feature will be live soon so wonāt disclose too many details. Wait for our next post to find out!
š„ Express Checkout š„
Namshi uses a three-step checkout on all platforms as it was proven to be our customer’s preferred model couple years ago. As time has changed, we redesigned the UI for a simpler checkout process and also added a feature to allow others to pay for your order! Stay tuned for our next blog for more details :)
We were excited to see participants from five departments working together and building innovative solutions across the disciplines of tech, design, marketing, and business. It was a fun weekend and we definitely want to have another one in a couple of months!
If you like our hackathon and are interested in joining us, check out our hiring blog now!
]]>Namshi runs an app that acts as a gateway in front of an MS SQL server. We recently moved our MS SQL server to a different cloud provider, and our MS SQL gateway started to get stuck (taking more than 10 seconds to respond), causing slow operations in the apps relying on the gateway. We received daily (and nightly) calls due to slow response and needed to restart the app quite often. The limited amount of logging also made it hard for us to pinpoint the bottleneck. The app was also written in C#, a less used language in our team, and requires more attention.
Refactoring the code gives us the ease of not needing to go through a full development and testing cycle. However, the app might still get stuck and take huge effort to debug and maintain. On the other hand, a complete rewrite will improve stability, the logging system as well as easier performance management.
Considering the benefits of each approach, we decided to give it a complete rewrite.
First we went out scouting for a driver. The driver we started with was the Node.JS driver. It was easy to use. However, it requires to specify SQL variable type when we create prepared statement. Our existing queries do not specify the SQL type for parameters, so it’s painful to add all the fields. So, we decided to opt for a second choice, the Golang driver. Golang has been popular in the backend team. We love it for its simplicity, performance, concurrency as well as its rapid development and growing community. Check out below the difference of creating prepared statement with NodeJS and Golang drivers:
To run an MS SQL Server locally, we used this Docker Image and created a test database for rapid prototyping. Our first snippet of code only had a single function to execute a dummy query against the database.
From there, we started implementing the app as per the old README
. We had to battle with taking care of data types (e.g, casting DECIMAL to float, or formatting dates correctly for MSSQL), use transactions in write queries and use connection pooling to enhance performance. For logging, we add logs for the time each query takes and the specific parameters each query uses. It becomes much easier for future troubleshooting and debugging.
Rolling out a critical app requires careful planning. To start with, we rolled out the apps on staging and ran test queries to make sure everything worked fine. Then we switched a few live apps on a separate service and kept them running for a period of time. After couple days, we rolled out more live apps and fixed bugs as they came. A week later, we switched all live apps and checked logs closely to make sure all went well.
With this rewrite we achieved much better performance. The integration with New Relic lets us check app performance in real time and figure out what is causing performance issue. Detailed logging allows us to debug and improve code rapidly. More importantly, this new app is well understood by the team and has been very stable since we switched. We are not receiving daily or nightly calls any more :).
]]>At Namshi, we run all kinds of workloads, from internal apps used by some of our departments to customer-facing APIs.
Recently, we’ve come up with a particular challenge: we wanted to track a high volume of events that happen on our mobile applications, and our go-to choice was to rely on Google Tag Manager to send these events to Google Analytics.
Long story short, the events we’re trying to track aren’t your usual pageview, or click on a product page, but a more casual action users do while browsing our apps — around 30M of them on a slow day. As soon as we started sending this additional traffic over, GA started rate-limiting us and it became clear we wouldn’t be able to piggy-back on Google’s analytics offering for this kind of tracking.
The next natural solution was to build our own event collector, something that proved to be extremely interesting: even though we’re not going to dig deep into our code (it’s really not that crazy!) we believe the experience taught us a lot.
As soon as we decided to build our own collector, we were faced with 2 simple questions: where to store this data and what platform to use?
To begin with, we benchmarked BigQuery’s streaming protocol and found it could easily sustain the amount of data we wanted to transfer so, considering we’re pretty well versed with BigQuery as we use it for a plethora of other projects, this was a quick and easy decision.
Then it came the time to decide on which platform we would build the app itself, and this was, again, a fairly easy decision: what we were looking for was a fast, pragmatic platform that would allows us to build high-performance webservers and integrate with BQ seamlessly. Our choice was Golang, as it allows to build incredibly efficient servers and has a very well-built package to interface directly with BigQuery.
As I mentioned, our code was fairly simple: a request comes in, we pull parameters from the URL and sync it into BigQuery.
Now, the app is definitely not optimized, as it tries to sync to BigQuery at every request — which is a (fairly) expensive operation: we had a reason for keeping it this way, a reason called Google App Engine.
Since we were worried about the scalability of our hosting platform, we decided to deploy this application on Google App Engine, an infinitely scalable platform ran by Google.
The tricky bit of GAE is that it “forces” you to run all of your application logic within a single request/response: everything you want to do needs to be completed before you return a response to the client. This is definitely an acceptable trade-off in a lot of use-cases, as it guarantees that Google can spin instances up and down at will, but didn’t work too great for us as it really added an expensive operation in our route (syncing to BigQuery).
Ideally, we would have liked to be able to execute the sync in background, but App Engine has a fairly complex implementation of background jobs that we didn’t like as much, as we wanted to keep the setup as simple as possible.
We went live with a working app within a day, but we immediately noticed a problem, as latency was much higher than we expected:
A median of 300ms for an app that simply receives a request and syncs it to BigQuery seemed way higher than we expected: we eventually didn’t bother as much as what we needed wasn’t high-performance, but rather high-scalability, and GAE fit the bill perfectly.
After a couple weeks, though, we noticed another interesting problem: since the app wasn’t as efficient as we thought, lots of GAE instances were being used to keep up with the amount of traffic we were receiving, something that reflected on our GCP bill right away:
This little tracking app was costing us around $150 a day ($4500 per month), way more than we initially budgeted: time to review the setup and come up with a more efficient way to use Google’s servers, at a fraction of the cost.
We are very big on Kubernetes, so the very next step was to try to move our application to the GKE, Google’s hosted Kubernetes service.
The idea was very simple: let’s rewrite the app so that it batches requests to BigQuery, let’s setup a small k8s cluster with node autoscaling and let’s set the right scaling policies (HPA) for our pods.
Rewriting the app was very easy: instead of syncing to BigQuery at each request, we simply created a channel that buffers up to X events, and syncs them in batch once the buffer’s filled up:
Next in line was to create the k8s cluster, which was an extremely simple operation from GKE’s interface: we deployed our pods, setup an ingress and… …boom, the app was live under a different URL!
Last but not least, we wanted to make sure that spikes in traffic were taken care of, both from a memory and cpu standpoint:
Once the HPAs were ready, we switched our tracking URLs and…
Where do we start? Well, since we’re all computer geeks at the end of the day, let’s look at our response times, now monitored through NewRelic:
Our 99th percentile is at less than 0.2 milliseconds which is definitely more like what we initially planned — we finally nailed it!
As far as cost is concerned, this new cluster (which, again, manages more than 30M events a day) costs us between $300 to $400, a ~90% price reduction compared to the cost of running the same application on GAE.
If we look at the pricing report from the GCP project in question you can clearly see the cost reduction as soon as we deployed the application on the GKE:
We also take advantage of a simplified setup where
we can manage the cluster through the good old kubectl
,
and deployments are much simpler than GAE (if you ever
used GAE you know what I’m talking about…).
The goal of this post is not to say that GAE is terrible, or that GKE is the best hosting platform out there: it merely is a report based on our own experience building a scalable event tracking system that we moved from one platform to the other. GAE is surely quicker to setup and includes additional abstractions that the GKE forces you to take care of (load balancing and SSL, just to name a couple of them), so we recommend to think about your use case and make a reasonated choice.
We truly hope you enjoyed this post! By the way, we’re hiring!
]]>In order to support the growth of our business, we’re currently beefing up our entire tech department, with the intention of developing even faster services and delivering an even more amazing customer experience: the end goal is to re-organize the structure of our team (which has always been split by skillset, as in “mobile”, “backend”, etc) and mimic the squad framework, where technical teams are split by “business function”. We’re never going to employ thousands of engineers but, as we feel the need to build a bigger tech pipeline and consequently hire additional software engineers, we think the squad framework provides a good structure for a bigger organization.
So, lots of hiring coming up here at Namshi: mobile, SRE, frontend, backend… …you name it, we’re probably hiring :)
Our mobile team, led by Abdul, is playing around with React Native and works on a daily basis with Swift and the standard Android toolkit (even though they’ve been flirting with Kotlin every now and then): their mission is to make our mobile apps blazing fast, smooth and as crash-free as possible.
On the frontend side of things, our team develops amazing web UXes and internal tools used within the company: our frontenders eat React for breakfast and are spearheaded by Shidhin, our most senior frontend engineer.
On the backend, Carles and Ayham lead a tight-knit team that focuses on delivering HTTP APIs for our clients to consume: the team deals with scalability and performance issues and solve problems that span across the whole domain, mostly with NodeJS, Python and Go.
Last but not least, our SREs build infrastructures for more than 100 services, all deployed through Docker containers orchestrated by Kubernetes. It is almost unbelievable to see what they allow others teams to do, especially considering the team is extremely small, as Abdelrahman and Andrey are our only SREs.
Sounds interesting enough? Then drop us a line at work-in-tech@namshi.com and let’s have a chat!
Oh, I almost forgot — a couple more things before leaving:
Adios!
]]>Android Navigation Drawer (a.k.a Burger Menu or Side Menu) has been ruling Android apps UX for almost 5 years now. Google has made it so easy to implement that it became the primary choice of every app developer when it comes to app navigation. Almost all the apps developed by Google migrated to Navigation Drawer after it was released, so did the Namshi one.
As per good UX principles : “It is extremely important to present your users with the most important destinations within the app.”
While Navigation drawer completely fulfills the above statement, There exist some fundamental problems with this navigation pattern. Some of these problems are :
These problems are described in detail here
Side menu or a Navigation Drawer can hold relatively large amounts of heterogeneous contents. Apart from having a regular list of navigational items, it can also accommodate secondary information such as user profile details, or actions that are less frequently used but relevant under certain scenarios. One of the major advantages of having a Side menu or a Navigation Drawer is in its ability to save the screen real estate by taking the navigation away from the main screen, thereby making less overwhelming to the users but also can generally result in having poor visibility.
Another major downside of having a Side menu or a Navigation Drawer is that users tend to lose the context quickly as in which page/ destination they are currently in. This cannot be identified easily, as the navigation is hidden beyond the edges of the screen and always require a click of a button or a swipe. Such a limitation in providing a quick visual communication is considered non-desirable.
For an app like ours, with fewer top-level destinations, having a Navigation Drawer is kind of an overkill because there isnāt any secondary information displayed to the user other than the navigation. A fair amount of the screen remains, unused.
A good percentage of the users prefer to have a single-hand interaction with their mobile devices/ apps. Pressing on the Burger menu icon in the action bar or swiping a finger from the edge of the screen reveals the hidden Navigation Drawer. Most of the cases, using Navigation Drawer will require the use of your second hand. Though this is a typical UX pattern followed in many play store apps, it is not really the best nor is necessary depending on the context of your app. It is imperative to have a consistent navigation and the flow within the app making sense to your users.
Bottom navigation is one of the best suitable navigation patterns, arguably due to its ergonomic placement on the screen. It provides quick and easy access to the various top-level destinations. As mentioned in the Google Material Design guidelines, it is recommended to use the new Bottom navigation when there are three to five top-level destinations thus making it ideal for the Namshi app, as it has five top-level destination pages (Home, Search, Wishlist, Shopping bag, and My Namshi).
Our app is highly configuration-driven. A set of configuration settings from our server, dictates the app on its various aspects such as the language of the displayed content, the home screen layout, content modules like images, gifs, videos, sliders, expandable/ scrolling lists, target for the user actions, showing quick alerts, arrangement of our products catalog, details in our checkout page, payment methods, our brand new delivery promises (read more), region-specific business rules. Pretty much everything in the appā¦ you name it, itās configuration driven! Navigation too is no exception and will follow suit! A specific property in the app configuration decides how our users will navigate within the app. This makes the implementation of the new Bottom navigation much challenging as any new changes should not break the existing Navigation Drawer functionality.
Bottom Navigation View is available as part of the Android Design Support library and the corresponding dependency should be added in the app build.gradle
file.
dependencies {
...
compile 'com.android.support:design:<relevant.sdk.version>'
// This was added in version 26.1.0. Visit the android doc for more info.
}
Once this dependency is added, next would be to include the BottomNavigationView in your app layout. Add the BottomNavigationView to the root layout of your app.
<android.support.design.widget.BottomNavigationView
android:id="@+id/namshi_bottom_navigation"
android:layout_width="match_parent"
android:layout_height="wrap_content"
android:layout_gravity="bottom" />
Having a CoordinatorLayout as the root will enable us to use bottom navigation behavior. This behavior will make the BottomNavigationView scroll aware by hiding/ showing it when users scroll through a list thereby giving more space for displaying contents.
Other Supported Attributes Below are some of the supported attributes.
Setting Bottom navigation Menu Items Adding menu items to a BottomNavigationView is similar to that of adding menu items to a NavigationView in a Navigation Drawer layout. Menu items can be defined in an xml menu resource file or can be added dynamically. Being configuration-driven, it makes more sense to dynamically add the menu items depending on the configuration, rather than to have it populated from a static menu resource file.
BottomNavigationView supports up to five menu items and anything more than that will result in a Runtime exception, crashing the app. This is a typical scenario that can occur upon activity re-creation when menu items are added dynamically.
See to it that a proper check is in place, so as to not exceed the limit of menu items in the BottomNavigationView. An alternative to this is to clear any existing menu items prior to populating it.
fun addBottomNavigationMenuItems() {
bottomNavigationView?.let { bnv ->
bnv.menu?.let { menu ->
menu.clear()
// Add menu items to bnv here
}
}
}
BottomNavigationView has a lot of limitations compared to many 3rd party Bottom navigation libraries. One such main limitation is the lack of support for Action Views in menu items. Android provides custom view support for menu items by the means of Action Views. Unfortunately, BottomNavigationView tends to ignore the Action Views, making it hard to customize individual menu items. Setting an Action View on the BottomNavigationView menu items seems to have no effect by which it is drawn in the layout. Below code snippet illustrates adding a Search menu item dynamically to the BottomNavigationView.
val menuSearch =
bottomNavigationView.menu.add(
Menu.NONE, R.id.bottom_nav_item_search, Menu.NONE, R.string.search)
menuSearch
.setIcon(R.drawable.bnv_search_selector)
.setActionView(View(context))
.actionView.tag = arrayOf(FRAGMENT_PRODUCTS_SEARCH)
Even though BottomNavigationView ignores the Action Views, this can still be leveraged to make our new navigation aware of the destination pages. Every menu item has an Action View set to it, so that, the respective Action Views can hold a list of fragment tags that it represents. More about this is in the Fragment Awareness section, below.
Just like any other views, BottomNavigationView also has got a set of events and associated listeners to it. The one we are interested now is OnNavigationItemSelectedListener. Selecting any menu items will trigger the onNavigationItemSelected() event of this particular listener. This event will also pass along with it the selected menu item based on which, appropriate logic for the navigation is performed.
override fun onNavigationItemSelected(item: MenuItem): Boolean {
when (itemId) {
...
R.id.bottom_nav_item_search -> appMenuListener.displaySearchFragment()
...
}
}
The Namshi android app follows a Single Activity and Multiple Fragments pattern and its architecture are highly decoupled. A helper class is responsible for performing all fragment transactions and this is in turn used by the AppMenuListener (a dagger2 dependency) which encapsulates the necessary logic for performing navigation to the appropriate destination page. When a user selects any particular navigation menu item, the corresponding event is triggered that invokes a specific action defined in the AppMenuListener.
Apart from this, users can still navigate to any destinations within the app by external means such as a Push Notification or even by Deep-links. In the Namshi android app, deep-links are resolved by a DeepLinkListener (yet another dagger2 dependency) which will perform the relevant routing, making use of the actions defined in the AppMenuListener. Implementing a consistent navigation across the app and to maintain the proper menu item states without changing this underlying implementation becomes challenging because, in such scenarios, navigation is not through but outside the bottom navigation.
In order to overcome this, our BottomNavigationView controller has implemented OnBackStackChangedListener of the FragmentManager class, which will trigger an event whenever a fragment is changed in the back stack. This will try to match the tag of the topmost fragment in the back stack to that stored in the navigation menu items.
override fun onBackStackChanged() {
clearMenuItemState()
// NPE Check - if not detached from the activity
val topFragment = FragmentHelper.getTopFragment(activity)
topFragment?.let { fragment ->
changeMenuItemState(fragment.tag)
}
}
fun changeMenuItemState(fragmentTag : String ?) {
... // Clear previous menu states if required
menu?.let {
for (i in 0 until it.size()) {
val menuItem = it.getItem(i)
menuItem?.let { item ->
val tags = item.actionView?.tag as? Array<String> ?: null
val index = tags?.indexOf(fragmentTag) ?: -1
if (index >= 0)
... // Change the menu item state and return
}
}
}
}
Letās see the new Bottom navigation in action!
One of the most sought-after features for the Bottom navigation is to have a notification bubble with a notification count which is not supported by the BottomNavigationView out of the box. Using Action Views would have been the ideal approach for such use cases, but that is not an option here! Having that said, it is also not an impossible task either, to implement a simple Notification bubble to the menu items in the BottomNavigationView. Just a tiny tweak in the BottomNavigationView layout hierarchy can help us reach our goal! Every menu item in the BottomNavigationView is essentially a BottomNavigationItemView extending the android FrameLayout. There are no APIs available to interact with this directly. Below is a sample snippet for adding a notification bubble/ badge to any specific menu item in the BottomNavigationView.
fun addNotificationBadge() {
bottomNavigationView?.let {
... // Get the Menu View from the parent BottomNavigationView
menuView?.let { mView ->
... // Get the corresponding menu item index
val menuItemView = mView.getChildAt(/*index*/) as? BottomNavigationItemView
val bubbleView = LayoutInflater.from(context)
.inflate(R.layout.bottom_nav_bubble_layout, null)
... // Find the corresponding view to update the count
menuItemView.addView(bubbleView)
}
}
}
Voila! Make sure to add the notification bubble during the initial setup of the BottomNavigationView but after the initialization of the menu items.
It will be good to consider making the notification bubble layout as simple as possible so as to reduce the layout over-draws. Adhere to good practices, use flat rather than nested or intricate layouts!
During I/O 2018, Google introduced the new Navigation-components to the Android Architecture which will greatly simplify the way navigation is done within the app. This will help in implementing a consistent navigation between various destinations within your app in a disentangled way. Each destination can be a fragment, an activity, a navigation graph or a subgraph. Custom destinations are also supported. Navigation-components also support actions, type-safe arguments, deep-links and will also go well with the BottomNavigationView. Many of the problems and user requirements mentioned above can be addressed with this. One such important issue that this will solve, is building the stack of destination pages when a user navigates through a deep-link, which otherwise would have happened during manual navigation. Our app, being mostly a āSingle Activity and Multiple Fragments appā can be easily migrated to the new Navigation Architecture with less effort. This promising new addition to the Android Architecture enforces conformance to the Architecture guidelines thereby facilitating a consistent and predictable navigation by decoupling the routing logic that otherwise is contained in the view layer, which can become quite tedious to maintain and modify in larger applications. Another great feature to have with Bottom navigation is to introduce the Bottom Navigation Behavior which will show and hide the Bottom Navigation View when a user scrolls through a huge list just like our Products catalog page, giving more space for displaying the list contents.
Android BottomNavigationView has got several limitations and there are many 3rd party implementations overcoming them. Nevertheless, none of that has stopped us from using it in the Namshi android app. We at Namshi embrace new challenges that help us get better in delivering the best experience for our users. Apart from this fixed navigation pattern, the deep-links support provides quick access to any specific destinations within the app rather than to go through multiple levels, manually. Fragment awareness comes in handy, as this will make the Navigation menu items to be on the right state when the destination page is loaded. By using Bottom Navigation, the content of the app of becomes readily discoverable and it gets easy to do single-handed navigation. Go ahead and download Namshi App from Google Play and let us know how the new navigation feels like!
]]>Usually, in an e-com transaction, a 3rd party courier is involved in the delivery of the goods, and the same applies when customers want to return, or exchange an item they purchased.
This leads to an interesting dichotomy, as e-commerce should, in theory, ease the process: but by waiting for the courier to collect the original item and deliver it back to the store; let the store confirm the return is in good condition, hand the new item to the courier and wait for the courier to deliver it to youā¦the customer experience suffers. This process can take weeks, and can be definitely improved.
At the beginning of this year, we focused our attention towards our exchange process (when you bought an M but want to replace it with an L), in order to make it seamless for customers to exchange items they purchased at Namshi. We believe weāve made strides in this process and wanted to share with you the changes weāve implemented, our rollout strategy and the challenges weāve faced along the way.
The new process we rolled out allows customers to request a new size without having to place a new order, without having to worry about the new size going out of stock, and have it delivered to their doorstep, in some cases, in less than a day.
Letās get to it.
Our original exchange process had a pretty basic flow. A customer would place an order with some items, and if they decided to return any item(s), a return would have to be initiated via the account section. Our driver would then head over to collect the items that needed to be returned. Once those items reached our warehouse, we would then refund the amount owed back either as Namshi credit or as a credit / debit card refund. At this point, the customer could place a new order for the new size.
This approach seemed pretty dated as our customers suffered because of the extended time frame of the whole process, during which the size they wanted instead could have ran out of stock, but also because during this time, the price of the product may have fluctuated. This might result in them having to pay a higher price.
At first, It wasnāt clear how we were going to implement exchanges. We knew we had all the components for creating an exchange in place, so it was a matter of connecting the dots to produce a single process that makes it easy for the customer to create an exchange with just a few clicks.
Therefore, we had to make sure of a few things:
We created a new API that could handle both normal returns and exchanges. This API proxies all normal return requests to the returns service, while handling exchange requests also. In the case of exchanges, the API first creates the exchange order, this guarantees the stock to be reserved. Then a return request is created which is associated with the newly created exchange order. The customer just has to wait for the courier to come and pick up the original item. Once the item is picked and returned to the warehouse, we ship the exchange order.
For exchanges, we handled the payment of the exchange order via our customer wallet. Normally we charge the customer wallet as soon as an order is placed. However in this case, we hold on to charging the wallet until the returned item is refunded back to the wallet. This ensures that we only use the refunded money to pay for the exchanged item. This also prevents a customerās wallet balance from becoming negative since we refund first then charge the wallet. These actions are clearly reflected in the customerās credit section.
We also had to account for unhappy flows; For instance a customer may cancel the return, so there would be no item to be picked up. In this case we cancel the exchange item as well, because there may be no funds available in the customerās wallet to cover for the new item. Also we can fairly assume that since the customer canceled the return, they probably changed their mind about the exchange.
Additionally, we created a cron job that is responsible for canceling any exchange orders if we don’t receive the original item (for whatever reason) within 2 weeks of creating the exchange request.
We’ve rolled out exchanges to our markets, sent out surveys and our customers were very satisfied with the new process. It was clearly a success story, but we wanted to do more! We thought to ourselves, so instead of waiting for the item to reach the warehouse to release the new item, why don’t we do it at the customer’s doorstep.
At the doorstep exchanges entailed our courier agent going to a customerās delivery address, picking up the original item and handing over the new product in one go!
In order to do this, we built a flag in our systems to recognize these swap requests. Once this was done, just as with exchanges, we began to reserve items as soon as we received a request for a doorstep exchange. This shipment was released to the same courier agent who was expected to collect the original item.
Since at the door exchanges was a novel concept in the region, we conducted an extensive training process for our courier agents. We trained them to identify and match items so that items returned back to us matched the ones we were handing over to our customers. We also had to ensure that our agents could handle scenarios where our customers were only returning some items from an order, receiving other orders at the same time, changing their mind regarding their swap requests when the courier agent arrived etc.
Once we were confident that our in-house courier agents could handle doorstep exchanges, we began rolling it out incrementally to customers across UAE. We began with Sharjah, followed by Fujairah, Ajman, Ras al Khaimah, Al-Ain, Abu Dhabi and finally Dubai. We rolled out doorstep exchanges successfully across the UAE within the course of just 5 weeks!
The end goal is always customer satisfaction!
For this purpose, we ran 3 surveys to gauge how our customers felt about our original returns service, exchanges and at the doorstep exchanges.
We wanted to learn whether customers were satisfied with these services and also if there was anything we could do to improve these further.
We found out that our customers were pretty satisfied with the original returns process with a combined satisfaction rate of very satisfied and satisfied customers at 75%.
For those customers who expressed that they were dissatisfied with our service and if they gave us feedback as to why they were unhappy, we analyzed their responses to see if we could further improve the returns process and factor those suggestions in.
Given that we just launched exchanges across all our markets, we were pretty excited to hear back from customers about how they felt about this new venture.
and voila!
Our customer satisfaction rate shot up to 88%.
Our customers loved this new feature! Exchanges now enabled us to reserve items for customers and ensure that they get the same deals, discounts and prices that they purchased their items for.
We received some feedback from customers regarding our process seeming too long. Our courier partner would collect the original item(s) from the customer and we would dispatch the exchange item(s) once we received the original one(s).
This feedback tied in neatly with our next initiativeā¦ At the door exchanges!!!
Once we launched doorstep exchanges, we ran another survey to see what our customers thought:
We reached a 92% satisfaction rate with at the doorstep exchanges.
Both regular exchanges and at the doorstep exchanges were a success with our customers!
By enabling exchanges across Saudi Arabia, Kuwait, Oman and Bahrain, we succeeded in accomplishing a significant KPI we set for ourselves: boosting our customer satisfaction rate. While international exchanges did not improve our delivery time, we managed to make our customers happy by reserving products they liked and purchased in the sizes they wanted, ensured they continued to benefit from any deal or discount they purchased it with and if the price for that product went up, our customers werenāt obliged to pay the difference!
With at the doorstep exchanges, we went even further. Not only did we further boost our customer satisfaction rate, we also managed to reduce overhead costs by having our couriers pick up the original item and drop off the exchange item in one trip. Our exchange delivery time went down from an average of 4.2 days to just 1.3 days in the UAE.
Weāve only been able to roll out doorstep within the UAE using our in-house carrier Last Mile. This is primarily because we had the capacity to train our courier agents on the swap process. Scaling this feature internationally would entail working with and training our courier partners to be able to conduct these swaps for us. This limitation prevents us from rolling this feature out internationally, but we would love to be able to work with our external courier partners to be able to do so!
This article has been a joint effort between the Software Engineers and Product Managers who planned and changed the process: Ala, Sakina Sagarwala and Ayham.
]]>E-commerce has made great technological strides in the last decade. Thereās no doubt in anyone’s mind that the paradigm shift of what the experience of a āpurchaseā is has already taken place. E-commerce will only get larger, while brick & mortar will continue to dwindle. Yet all of this innovation still fails to recreate the sensations of instant gratification most shoppers feel at the checkout aisle. This gap in the process can be taken advantage off. By giving users a determined and relatively quick delivery date such as same day or next day delivery, we can bridge the gap just enough to provide semi-instant gratification. This semi-instant gratification, is enough to pass off as a reward to entice users into completing the purchase within a certain time frame to remain eligible for it.
Yet, this feature is a double edged sword. On the one hand, you can increase conversion rates and customer satisfaction when everything works well. On the other, users are much more irate when delivery is not made at the expected times.
In order to test the success and impact of this project we had to benchmark it against a few KPIās.
We decided the best would be to track how our:
We decided to roll out slowly, segmenting by platform and geographical region. We started first on our web mobile platform and then slowly rolled it out to our apps all within certain geographical regions where we could ensure a higher minimum delivery SLA.
Our goal for the UI was to make the expected delivery information instantly accessible and visible, without compromising on more important information like product image, description, price and available sizes. Keeping the natural flow of the page is critical.
To achieve this goal, we added the feature section right after the product image/details section; where we show 3 pieces of information:
We also added this information in our cart view popup to keep users engaged and informed about the expected delivery dates for their orders.
Initially, we wanted to add the feature to our checkout page too. However, we found that it wonāt be possible because we currently take user delivery addresses in open input text fields. Users can enter any text to describe their locations including cities, hence, we could not query the expected delivery service without a properly formatted input which would be in the form of a predefined set of cities. Goes to show that something as simple as a field type could be a blocker for a feature to work!
One of the challenges we faced was to find a way to display the most accurate delivery information as fast as possible and also customizable on the product level.
Collaboration with the ops team and understanding their delivery challenges was critical in the development of this feature. Despite this only being a forecast, our users would view this as a promised commitment. If a customer reads and believes that his order will arrive the same day, receiving it late may result in a tremendous loss of good-will.
Due to this risk, we created an internal tool for our warehouse and operations team. This tool allows our teams to change the delivery lead time for different locations on the fly. It also allows for the changes in delivery cut-off times. At any point if we receive an overwhelming amount of orders they would be able to change the lead times and/or cut off times within seconds.
One important issue that we faced was with time zones. In order to provide an accurate delivery promise we need to know where the customer is located and where we have the product stored. Each one can be in different time zones which makes the logic harder. Imagine that you send a product from GMT+4 to your customer but theyāre living in GMT+3, you know that the delivery will take 1 hour and you send it at 8 a.m. so you tell to your customer that he will receive it at 9 a.m. but actually he will receive it at 8 a.m. As your 9 a.m. is their 8 a.m. One way to solve this is to tell the customer how long it will take instead of specifying the delivery date, for example: āin 1 hour and 15 minutesā, but for longer periods of time this becomes less useful. Another way is to yield this responsibility to the frontend as they know the actual timezone of the customer. So only sending the amount of time it will take for us to deliver, will allow for the front end to specify the delivery date perfectly to the user.
Another critical point for this feature is that itās present in all parts of our customers critical path, so in addition to deciding how to implement it we had to rack our minds to decide where we needed to show it. Implementing this in our catalog proved challenging in terms of maintaining performance. In order to reduce the footprint we had to think carefully as to how we implemented and managed the cache. We did load testing to see how performance was affected. Our results showed that we increased the response time by between 1 to 5 milliseconds. This was not ideal, but still acceptable.
We hope this feature helps you, and you get your packages on time!
This post is a joint effort between the brains behind this feature: Carles Iborra Sanchez, Ammar Rayess and Razek Amir.
]]>At Namshi, we are saving a bunch of “business” metrics and storing them in prometheus, with alerts based on conditions over those metrics (for example, if hourly_visits < X: trigger an alert
).
We have hundreds of applications and cronjobs, periodically sending metrics to prometheus using the pushgateway, which collects metrics and makes them available to prometheus.
In order to send metrics from our crons etc we can simply curl to the pushgateway:
The alerts are defined with k8s configmaps, such as:
Everything has been running fine until we started facing some issues related to managing the infrastructure around prometheus, which is not funny: instead of spending time managing prometheus, we could shift our efforts towards our core business.
Google came up with StackDriver, which seems to fit our bill: SD has a monitoring service as well as and alerting service which allow us to send metrics and create alerts based on those metrics.
To send business metrics to StackDriver, we would have needed to do the following for every single app in our cluster:
(if we were running on GKE we could have avoided step #1, as Google auto-mounts credentials on its own instances)
At Namshi we have hundreds of services, and doing that for every service would have been painful: the solution we came up with was to create something similar to the prometheus pushgateway, where we could just send the metrics to a gateway, and the gateway will then send those metrics back to StackDriver. We built a “StackDriver pushgateway”, and the effort that took us to migrate all services to StackDriver was as simple as changing the endpoint of the gateway.
Interested by sending business metrics to StackDriver? Good news, as we open sourced the Stackdriver pushgateway!
To start sending business metrics to StackDriver, here are the 3 simple steps:
Have fun monitoring on StackDriver :)
]]>Here at Namshi we’re committed to continuously improve our security posture, by either collaborating with security researchers across the globe or with in-house expertise.
With this in mind, we would like to hire a security researcher that can help us from this perspective: we see security as being a topic that will only gain additional importance as time goes by, and we’re committed to dedicating the right amount of time, and money, to the cause :)
As a Security Engineer, you’ll be tasked with running internal assessments, ranging from pentesting our cloud infrastructure to social engineering around the office, review our security policies and define the best strategy to improve our posture. In addition to that, you will be actively collaborating with external researchers through our HackerOne program, which is going to be directly under your responsibility. On top of this, as the months will go by, you will probably spend time training both our technical and non-technical staff to raise awareness and make sure we got the basics covered.
Been into it since Kali was Backtrack? Spend time going through public bounty programs to hack your way to a reward? Want to take on the responsibility of shaping Namshi’s defense? Then weāre definitely a match!
What are you waiting for? Send your application to work-in-tech@namshi.com
and
let’s have a chat!
P.S. A few months back I wrote a small piece about Namshi’s hiring process and desiderata, give it a look!
]]>Here at Namshi we’re constantly trying to renovate our stack by using the best from the open source ecosystem: from NodeJS to Kubernetes, our stack bleeds with interesting tools to work with.
As a Sr. Backend Engineer, you’ll be tasked to work on a spectrum of services ranging from our customer-facing APIs to tools that power our logistics infrastructure. We are a very pragmatic and experienced team, so from time to time you will see engineers busy TDDing on a feature, whereas other times we’re straight to live. We pride of being a heterogeneous team that’s experienced to know how and when to abstract.
We run a Service-Oriented architecture with 100+ microservices where JS plays a huge part: our stack is comprised of many different tools and we’re always up to experimenting in light of new, harder challenges.
Some of the things our backend team has been working over the past few months:
Most of our backend apps are built with NodeJS, although some of the apps still kick it in Symfony2 or pythonic boots. With a fleet of 100+ microservices, we’re generally very busy trying to innovate as much as possible — and refactoring when we need to pay our technical debt back.
Understand the HTTP protocol? Like deploying microservices on kubernetes? Async programming doesn’t scare you? Then we’re definitely a match!
What are you waiting for? Send your application to work-in-tech@namshi.com
and
let’s have a chat!
P.S. A few months back I wrote a small piece about Namshi’s hiring process and desiderata, give it a look!
]]>5 (long) years ago we responded to our very first vulnerability report, submitted by a web developer whose better half had been using our services, who noticed a small glitch in one of our webservices. Since then, we processed quite a few (and luckily not-so-many) submissions, handing off rewards to researchers who would submit valid reports.
The process had been quite unstructured until a couple years back, when Boris joined GFG, at the time our majority stakeholder, and suggested we should try hackerone as it had been working well for other companies — needless to say, this was a turning point for us, as we finally found a platform that could take care of coordination with security researchers.
At that point we started phasing out the historical security@namshi.com
email
address in favor of inviting researchers to our H1 program, which has definitely
helped us defining better boundaries (especially in terms of timeline, rewards and
scope of the program) between Namshi and the community of researchers out there.
As mentioned, we run a (private) program on hackerone and, in parallel, process
submissions to security@namshi.com
by asking whoever reaches out to us to
create an account on hackerone so that we can then move the conversation from
email to a proper bug bounty platform.
Our program defines a disclosure policy, list of exclusions and a brief legal appendix to guide you through the process of submitting a vulnerability report to Namshi. The list of exclusion also contains an associated list of behaviors / actions that will result in your submission being ineligible for a bounty, such as:
…and a few additional points. We do believe our program is fair and guarantees a good balance between what we demand and what we offer, but we’re always open to suggestions, or questions, from your side. Feel free to reach out if you think we should amend some of the points in our program.
In addition, I wanted to mention that we recognize that the only public information available on our websites (our security FAQ), is by no means exhaustive, and we plan on fixing it in the upcoming months: that’s where the next paragraph kicks in :)
You might be wondering: “why are you telling us about a private bug bounty program that’s been kept private and we don’t know how to join? Is today the lets-share-news-people-couldnt-care-less day?”
We’re sharing this because we want this to change, and we want to be more open about some of our processes: our goal is to be able to make our program public in the upcoming months, so that more and more researchers can help us making Namshi a safer place on the web.
The traditional challenges with having public bug bounty programs are related to the “signal vs noise” ratio as well as the fact that companies think the more they keep in the dark, the less they’ll expose — we don’t share the same beliefs, and are currently making a step to expand our program to more researchers, with the ultimate goal of making it public. At the same time, our tech department is fairly small so we want this transition to be as smooth as possible, hence the slow rollout — consider this a canary release until everything is well-oiled and we’re comfortable enough with making the program public.
With this in mind, I’d like to invite everyone who would like to take a look at
our program to mail us at security@namshi.com
and share the email they use on
hackerone, so that we can invite you to the Namshi Bug Bounty program. As I
mentioned, this is a first step towards our program turning public in the upcoming
months.
Considering our goal to be more open and transparent, I would also like to take a second to disclose some of our stats taken from hackerone:
Happy hacking!
]]>Some of the available open source UI components are very well written and while working with these, you will get a lot of inspiration. I wonāt hesitate to mention SkyFloatinglabelTextField from SkyScanner and XLPagerTabStrip here. Sometimes, the UI requirements are very specific and UI libraries will not support the particular use-case you have. While working on the UI improvement for Namshi iOS app, we faced the same situation where we had to modify an existing library to tweak its looks.
So it was a combination of inspiration and custom requirements that resulted in two awesome UI components which we recently published on Cocoapods. Let me Introduce these libraries separately below :
https://github.com/namshi/NMFloatLabelSearchField
We had a requirement to implement UITextFields on which hints float up when the user starts to type; the border can also be highlighted based on different delegate callbacks and on validation errors.
We found SkyFloatingLabelTextField which does that perfectly and supports RTL languages as well. Here comes the challenge: we had a city suggestion field in the form which dynamically displays a suggestion list as user starts to type, and this feature is not supported in SkyFloatLabelTextField. So we started our search again and found one more library, SearchTextField. We went ahead with it and used both of them.
Soon we realized that the UX of the screen is not appealing as five fields (name, country code, city code, phone number and address) are having floating-placeholders but the city field looks like a fish out of water here. We at Namshi are always eager to make the UX smooth and appealing for our customers, so we decided to join the two third-party librariesā functionality and combine them for our city-search-field.
In the beginning, we extended the functionality of SearchTextField and added the code from SkyFloatingLabelTextfield to achieve FloatingLabelSearchField functionality. It worked well but we realized that we are not properly getting the textField delegate callbacks (didEndEditing never worked). We looked into the open issues for SkyFloatingLabelTextField but there was none related to this. Then we looked for the open issues for SearchTextField and ā voila! ā we found an open issue in the library. We changed our strategy; extended the functionality of SkyFloatingLabelTextfield and added the code for SearchTextField in the our code. We faced few bugs and me managed to fix those andā¦.. Yalla, it really worked! Soon our app was in store with the awesome looking āAdd New Addressā screen with smooth user experience.
https://cocoapods.org/pods/NMAnimatedTabBarItem
https://github.com/namshi/NMAnimatedTabbarItem
The tabbar used in Namshi app was pretty basic, it looked like the tabbar from Apple’s built-in apps when iOS 7 was released. We realized that almost all the major apps are incorporating some animations on tab bar so it was the right time to spice up UITabbar used in Namshi app.
We first started with Ramotion ā this library is awesome! After playing with it for few hours, we realized that it has some deal breakers such as missing support for RTL languages and has a problem putting tab items back into the correct position when you move to a screen which does not have a tabbar and try to come back to a screen which does. We forked the library, tried to solve the issues but gave up as, one after the other, new issues came up.
We started by digging deep into Ramotion and we got the basic idea how they are animating Tabbar items. We used the same approach and made the whole thing much more simpler.
We created an open class NMAnimatedTabBarItem inherits from NSObject with a public method called animateTabBarItem.
We have to pass 3 arguments to this method, tabBar(UITabBarController.tabBar), tabIndex (Selected tabItemIndex) and finally animationType(NMAnimationtype).
NMAnimationtype could be:
For Bounce, Rotation and Transition tabbar item image required. For Frame animation we have to pass UIImage Array.
We, though, would like to share the story and advices from the women who are part of our team, with the hope that they’ll inspire others to join us, or to simply give computer science, or programming in general, a go.
Without further ado, let me introduce Noor, who:
…is a telecom engineer with Masters in Computer Science from Karachi, Pakistan. She started her career as an iOS developer, enhancing her skills in Android and then Mac development. She is a diversified team player, a detail oriented resource, and a quick learner. She has keen interest in application development based on smart TV, smart watch, google glass apps, and wearable gadgets. She loves to spend time learning new technologies related to big data and mobile apps development.
Can you briefly tell us a bit about yourself?
I am an ordinary omnivert person who is telecommunications engineer by education and software engineer by profession. I am often considered as a backstage performer. I love to write blogs and do voluntarily work whenever I get time.
How did you get into programming & computer science?
My final year project in Bachelors was on MATLAB which enhanced my programming and research skills, then later got chance to work on android platform. Based on programming concepts, got job as trainee iOS developer and hence the CS journey started. Later decided to continue education in computer science and did Masters in IT with thesis on NLP.
What does your typical day at work look like?
Like this:
Jokes apart, besides working on the assigned tasks in office, I try to learn at least one thing new everyday. I manage my own sheet to track my progress.
What is the most challenging project you worked on? The one that made you the proudest?
All projects have different challenges and I am proud of every app I’ve worked on. The one that made me proudest was my first mac app, LightUp. Because working on mac app was different from mobile apps, there were more challenges there like changing window size, menu controls, etc.
What advice would you give to a woman considering a career in the tech industry? What do you wish you had known?
Try to think out of the box and work smart, not hard.
Thanks Noor — both for sharing your experience and keeping the Namshi mobile apps under control! :)
]]>It is no news that we’ve been banking on the JS ecosystem for a few years: from rolling out our first angular apps in 2013 to using React Native in our android app, we’ve been very busy trying to push our frontends as far as possible.
We run a Service-Oriented architecture where JS plays a huge part: most of our services are either SPAs or small NodeJS-backed APIs, and JavaScript is king at Namshi.
We would like to work with someone who has a very strong background in the language, who’s been battling on the frontend for a few years and is not afraid to dive into Node, if required.
Some of the things our frontend team has been working over the past few months:
Most of our frontend apps are built with React, although some of the older apps still kick it in angular boots. With a fleet of 100+ microservices, we’re generally very busy trying to innovate as much as possible.
Understand the inner workings of virtual dom? Think redux is not a replacement for components’ state? Grasp how HTTP/2 helps frontend developers? Then we’re definitely a match!
What are you waiting for? Send your application at work-in-tech@namshi.com
and
let’s have a chat!
P.S. A few weeks back I wrote a small piece about Namshi’s hiring process and desiderata, give it a look!
]]>We are fully running kubernetes in production which makes it exciting for the challenge of how we can actually test chaos engineering in production with our microservices.
We chose CoreOS Container Linux as our preferred operating system because of faster bootup time and it does only 2 things for us: docker service (for running containers) and flannel networking (for inter-pod networking).
We use both launch configuration and autoscaling service to manage our fleet of spot instance.
Some of the questions we asked oursleves on how to setup a robust infrastructure to support any kind of termination of the spot instances
Gracefully rescheduling pods initially do seem straightforward until we started noticing some issues with image pulling from our private registry and the docker hosts. This usually happens as a result of spike requests if more than ten (10) images of around 200MB size are being pulled at the same time. There is kubectl drain which works pretty well but not for us because of the issue mentioned earlier.
Luckily, AWS introduced spot instance termination notice which is a 2-min window to do cleanups before the spot-instance is terminated, we wrote a simple golang binary which watches the instance metadata for the termination notice and does the following within the 2-min grace:
This binary is managed by a systemd service
It is advisable to run the spot-instances in at least two availability zones to cope with surge in price in one of the availability zones. If there is a price surge above the bidding price in one zone and the spot instances are terminated, autoscaling group service automatically launches the same number of terminated instances in the zone(s) with bidding price higher than the current spot price. With this, we achieve something close zero-downtime during the re-scaling activity.
This also poses another challenge when the spot price drops below the bidding price in the previously affected region. What happens is that two instances launched back in eu-west-1b
while the same number of instances are terminated to balance the autoscaling desired capacity. In this activity, we are going to lose instances abruptly, but luckily AWS autocaling service has a feature called lifecycle hooks.
To avoid abrupty autoscaling termination, we added a lifecycle hook for autoscaling:EC2_INSTANCE_TERMINATING
transition state with the notification target as SQS. This sends an event containing the instance to be terminated to the SQS. We now have a python script (can be converted to a lambda function) which:
All the tasks above are completed within 2-min window to match the spot-instance termination notice period.
We use Sensu as part of our monitoring stack and developed a simple sensu (ruby) check which compares the current spot price from AWS API against our bidding price used in the launch configuration. We do mark the check state as warning when the spot price is within the warning and critical threshold for all the zones in the region and the check is only marked as critical if the spot price is higher than our critical threshold in all the zones in the region. When the check state is critical, there is an auto-remediation script which switches the launch configuration of the autoscaling group for the spot instances from spot to on-demand (the script clones the current launch configuration, removes the spot price and replaces the launch config in the autoscaling group). With this, we don’t end up with no running instances.
So far, this has been working well for over a year without any major issues and we have been able to save between 35% and 45% on the instance cost since then.
Hope you can give it a try and feedbacks are appreciated.